

All businesses focus on optimizing their website on-page SEO factors to increase their organic keywords as well as traffic. But most of them didn’t focus on Improve Core Web Vitals. Search engine optimization (SEO) is broadly classified into three types:
-
- On-page SEO
-
- Off-page SEO
-
- Technical SEO
On-page SEO
On-page SEO is optimizing every page on your website to rank higher on SERP. Optimizing every page with On-page SEO factors like Meta-description, Title tags, Headers, content quality, internal links, etc.
Off-page SEO
Things you do outside of your website to improve your site performance in SERP, like Impressions, Organic keywords, Traffic, etc. Off-page SEO techniques are Social sharing, Building backlinks, etc.
Technical SEO
As per the latest survey, 59% of all website traffic comes from mobile devices. Optimizing Technical elements makes your website easier to crawl. This will improve your site performance on mobile devices. Mobile-friendly design, Broken pages, and Core web vitals are some factors of technical SEO.
Implementing page speed leads to improved core web vitals, This includes three specific measurements of Google to measure website performance.
These are:
-
- LCP (Largest Contentful Paint)
-
- FID (First Input Delay)
-
- CLS (Cumulative Layout shift)
Analyzing your website
To Optimize your site performance you need to analyze the current performance. Page speed insights is a free tool developed by Google that analyzes the site performance on mobile devices and desktops and provides performance scores out of 100. The higher the score the better the performance will be.
If the score is not up to the mark, you must focus on the opportunities and diagnostics.
As we have seen earlier this performance score is calculated from the following metrics,
Metrics:
-
- LCP (Largest Contentful Paint)
-
- FID (First Input Delay)
-
- CLS (Cumulative Layout shift)
-
- SI (Speed Index)
-
- TBT (Total Blocking Time)
On these Metrics, TBT, LCP, and CLS have high weightage in calculating the performance score.
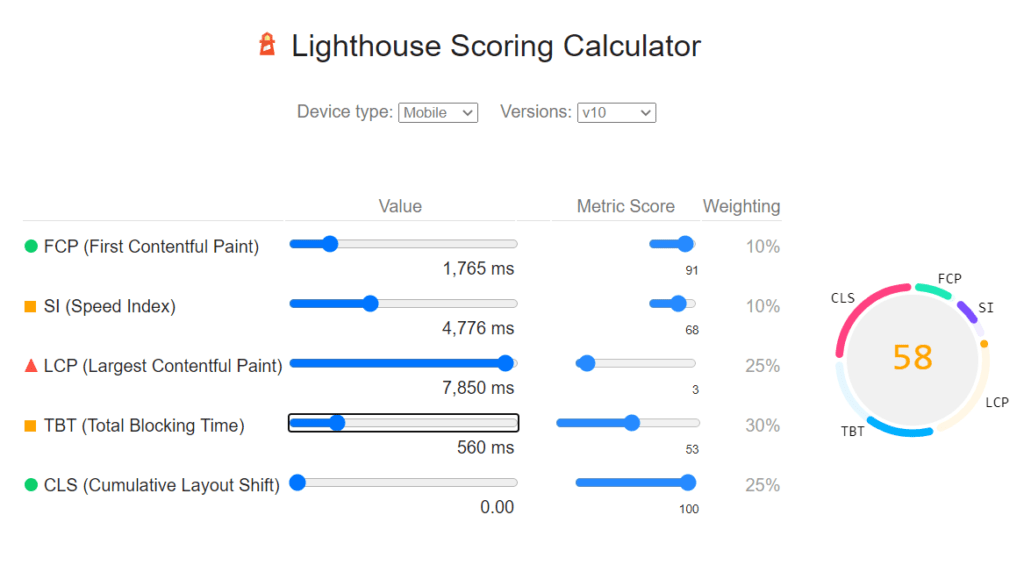
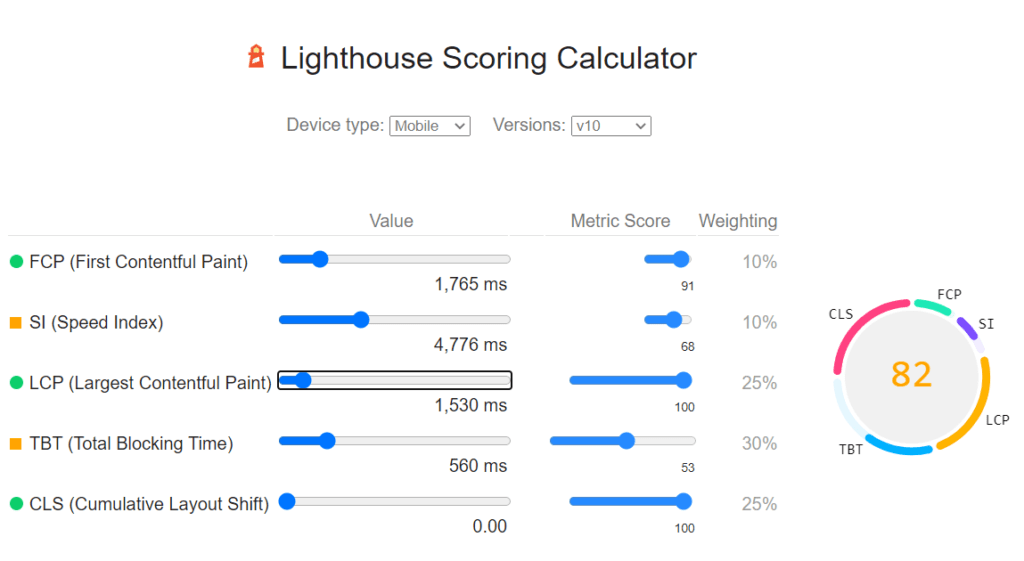
As you have seen in the above image, this website has a performance score of 58, and it was so poor in the LCP issue. Solving this LCP issue could optimize the page score to 82 as you see below:
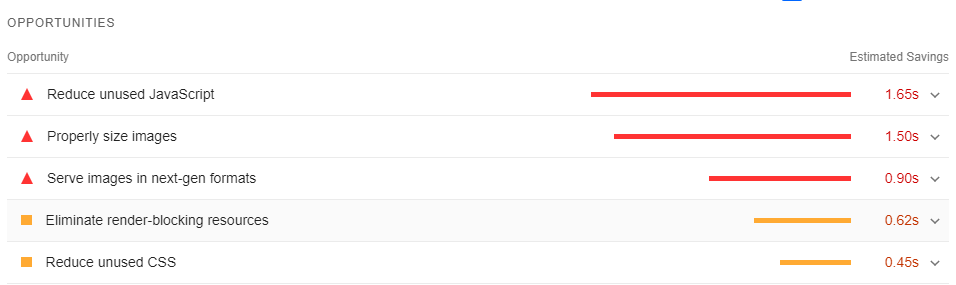
To fix the LCP issue you need to eliminate the following issues:
-
- Reduce unused JavaScript.
-
- Eliminate render-blocking resources.
-
- Reduce unused CSS.
Let’s see this one by one to how to resolve it. Here the methods are cost-effective and you can fix those issues as much as quick
Reduce unused JavaScript (JS)/CSS
To fix this issue use:
-
- Inline CSS/JS instead of a separate file.
-
- Use the Purgecss tool.
-
- Use CDN (Content Deliver Network).
Using Inline CSS/JS:
If you have a small amount of CSS, consider using inline CSS instead of a separate CSS file. Inline CSS is faster to load and can reduce the amount of unused CSS on your page.
Use the Purgecss tool
There are many tools available that can help you analyze your CSS and identify unused rules. One such tool is PurgeCSS, which can be used to remove unused CSS from your codebase.
Here are the steps to follow:
- Install Purgecss
-
- To install Purgecss first you need NPM (Node Package Manager) and Node.Js on your computer. If you don’t have it you can download them from the Node.Js website.
-
- Once you installed Node.Js and NPM on your computer, Open a Command Prompt and type the following command “npm install -g purgecss”. This will install the Purgecss in your system.
- Create a List of Files to be Purged
-
- Before you can use PurgeCSS, you need to create a list of files that you want to purge. This could include your CSS files, HTML files, and JavaScript files.
-
- For example, let’s say that you want to purge the CSS for the Astra theme. You would need to create a list of files that contain the Astra theme’s CSS. The Astra theme’s CSS files are located at “/wp-content/themes/astra/assets/css/theme.min.css”. You’ll need to include any HTML files that use the Astra themes CSS.
Here’s an example list of files that you can use:
“[ ‘/path/to/your/wordpress/installation/wp-content/themes/astra/assets/css/theme.min.css’, ‘/path/to/your/wordpress/installation/wp-content/themes/astra/*.php’, ‘/path/to/your/wordpress/installation/wp-content/themes/astra/js/*.js‘,]”
You’ll need to replace “/path/to/your/wordpress/installation” with the actual path of your wordpress installation.
- Create a configuration file
-
- In simple, (purgecss.config.js) is a configuration file used by Purgecss to remove the unused CSS from your stylesheets (Style.css) in your WordPress editor file.
-
- By creating a configuration file (purgecss.config.js) in the text editor (I.e Visual Studio code) for Purgecss, It tells the tool (Pugecss) which files to analyze for unused CSS and where to output the Purged CSS.
-
- In the file purgecss.config.js, you can define the following properties:
-
- Content: an array of file paths to analyze for unused CSS. This can include HTML, JavaScript, or other files that reference your CSS.
-
- CSS: an array of file paths to the CSS files that should be purged.
-
- Output: the file path where PurgeCSS should write the purged CSS.
-
- By creating this configuration file, you can customize the behavior of PurgeCSS to match your project’s specific needs. You can specify which files to analyze, which CSS files to purge, and where to write the output.
-
- Create a new file in a text editor and name it purgecss.config.js. Paste the following code into the file:
“module.exports = {
content: [
‘/path/to/your/wordpress/installation/wp-content/themes/astra/*.php’,
‘/path/to/your/wordpress/installation/wp-content/themes/astra/js/*.js’
],
css: [‘/path/to/your/wordpress/installation/wp-content/themes/astra/assets/css/theme.min.css’],
output: ‘/path/to/your/wordpress/installation/wp-content/themes/astra/assets/css/purged.min.css’,
};”
-
- You’ll need to replace “/path/to/your/wordpress/installation” with the actual path of your wordpress installation.
-
- Replace the file paths with the actual file paths for your installation of WordPress and the Astra theme. In this configuration file, we’re telling PurgeCSS to look for HTML files and JavaScript files in the Astra theme’s directory and to look for the Astra theme’s CSS file.
-
- We’re also telling PurgeCSS to output the purged CSS to a new file called purged.min.css in the Astra theme’s CSS directory.
- Run PurgeCSS
-
- Run PurgeCSS using the following command in your terminal: “purgecss –config purgecss.config.js”
-
- This will generate a new purged.css file that contains only the CSS that is used on your website.
- Implement the output in your WordPress site:
Once PurgeCSS has completed its task, you can implement the output in your WordPress site. In the case of the Astra theme, you can add the purged CSS to the Additional CSS section in the WordPress Customizer.
To do this, follow these steps:
-
- Log in to your WordPress site and go to Appearance > Customize.
-
- Click on the Additional CSS option.
-
- Copy the contents of the purged.css file and paste them into the text box.
-
- Click on the Publish button to save your changes.
-
- That’s it! You have successfully used PurgeCSS to remove unused CSS from your style.css file in your Astra theme and implemented the output in your WordPress site. Remember to always keep a backup of your files before making any changes.
- Use CDN (Content Deliver Network)
When a user request for content, the CDN determines which server is closest to the user and delivers the content from that server. This reduces the time takes to reach the content and also reduces the load on the website’s origin server.
You can activate Free CDN for your website using Cloudflare CDN.
Eliminate Render blocking resources
Use Preload
You can use the “Preload” function for your essential CSS, js files like themes, fonts, and styles, it will store this content as a cache and deliver it quickly, no need to load your webpage every time the user accesses it.
<link rel=”preload” as=”font”
href=”https://example.com/critical-font.woff2″ crossorigin>
Also In some cases, you can prioritize the “Preloading” function such as “Font” has to load first after that “images”. So, you can prioritize this “Preloading” function using importance=”high”
Like this:
<link rel=”preload” as=”font” href=”https://example.com/critical-font.woff2″ crossorigin rel=”preload” importance=”high”>
Use Asynchronous
Use asynchronous and deferred loading: By adding the “async” or “defer” attribute to your script tags(.Js files), you can tell the browser to load the scripts in the background without blocking the rendering of the page.

Difference between “Async” and “Defer”
If you use “Defer” the Script (.Js Files) is downloaded parallel to the page loading, and executed after the page has loaded. In case you use “Async” the Script is downloaded parallel to the loading page and executed as soon as possible (before the has been page loaded).
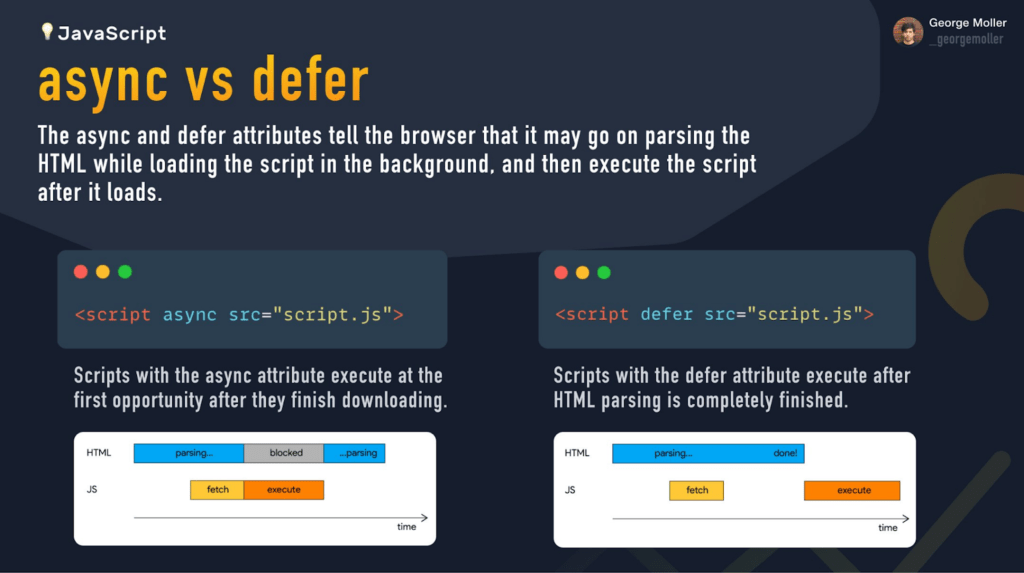
Source: Twitter
Wind Up
It’s necessary to improve your site performance mobile friendly. if your URLs are not mobile-friendly it will affect your impressions and rankings effectively. By following the above steps you could optimize your site speed and increase its performance.